Wednesday 30 January 2013

White Chocolate and Cranberry Fudge ♥

I have been busy making more sweet foods instead of teas as usual.  I have pinned lots of real food ideas and I have made a couple but never anything so exciting I feel like photographing and writing about it!  Not like cakes and sweets and all things sugary!  So my new year's resolution hasn't really worked.  I've made some different tatties recipes and a sweet and sour chicken recipe and also Yorkshire puddings from scratch but I have not managed a whole new tea recipe every week of January.  Oops.  Now I have pinned more ideas I will get onto it in February :)

If my resolution had been to make lots of junk for the month of January I would have kept to it :)


 Here is one of my favourite combinations:  evaporated milk, sugar and butter melted then brought to the boil and left to simmer for 5 mins.

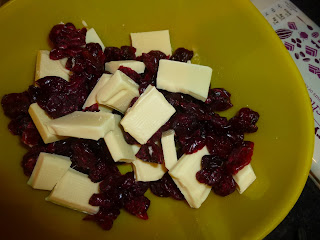
Dried cranberries and white chocolate - yum yum yum!  Cranberries are not just for Christmas :) 


Letting the white chocolate melt into the evaporated milk ensemble.  It gets lovely, thick and gooey 

 Poured into a prepared tin and left to set overnight

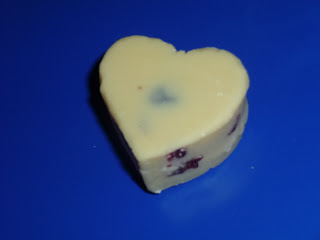
 Then cut into shapes

 Little love hearts for a Valentine's Day treat?


I am rubbish at photography.  I don't know anything about settings or lighting and my camera is not great but I am trying to learn :) This little photoshoot took tons of attempts to get any decent photos without flashback!  I really need to look up some pins on camera tips :) More excuses to spend time on pinterest! 

I ♥ Pinterest 


White chocolate and cranberry fudge recipe

12 oz granulated sugar
1 oz unsalted butter
6 oz evaporated milk 
3½ oz dried cranberries
10 oz white chocolate

Put sugar, milk and butter in pan.  Dissolve the sugar over low heat.  Bring to the boil stirring continuously.  Reduce heat to simmer for 5 minutes.  Remove from the heat and add cranberries and white chocolate.  Allow the chocolate to melt.  Stir and pour into a tray lined with baking paper,  Chill.  Cut into pieces with cutters if desired.  I desired :)


Tuesday 22 January 2013

Tea for two


When my friends come round I always like to make something homemade we can eat.  I never ever buy cakes or tray bakes from the supermarket because it is really easy to come up with something quickly out of my cupboards at home.

On Saturday my two friends came round for a catch up and this time I made them these little jam cakes.  They are called thumbprint cookies in the recipe book but I don't think they are cookie-ish so I need a new name for them!  Dimple cakes?

The tiny little jam dish is actually my Mum's.  She got this as a present and it matches my little set of teapot plates and spoons - which are too cute to use only for holding soiled teabags- so I stole it!  She knows I stole it so it's not that bad but I would use this so much more than she would so I am keeping it!  :)

Anyway the little jam cakes were so simple.  I got the recipe from a book called Sweet Treats.  It has lots of ideas for these "thumbprint cookies" like different flavours of jam, chocolate chips, dried fruit and sprinkles but I stuck with jam and my favourite nutella - I adore a nutella recipe!  Although this time I much preferred the jam.  The nutella was too hard once the cakes had cooled.

Waiting to be baked

I tried a few with a little loveheart cut out to see if it would work for a valentine's theme or desserts table with a heart theme


Pretty cute!  A little neater and I think it would look beautiful 

Now it is Tuesday these were finished over the weekend and I feel the need to make more :)

"Dimple Cakes"

1 teaspoon orange zest
285g plain flour
½ teaspoon baking powder
¼ teaspoon salt
230g unsalted butter softened
125g sugar
vanilla extract
strawberry jam - or jam of your choice/sprinkles etc.


Preheat oven to 180 degrees C

Beat the butter until soft. Add sugar. Add orange zest and vanilla extract. Weigh out all dry ingredients and mix. Add half to the butter/sugar mixture. Mix until just blended. Add the remaining flour mixture and mix until blended. Scoop up rounded spoonfuls onto a baking sheet lined with baking paper. Using your thumb/finger/end of a small rolling pin dipped in flour make a dent in the rounds. Fill each with a small amount of filling such as jam. Bake for about 15 minutes until just browning. 
I also sprinkled these with sugar as soon as they were out of the oven - because I can't get too much sugar into myself!  Remove and allow to cool on a rack for 10 minutes until completely cooled - you do not want hot jam burning your mouth and ruining the rest of your enjoyment of these babies.


Sunday 13 January 2013

Happy Birthday Dad

\mathbb{H}\mathbb{A}\mathbb{P}\mathbb{P}\mathbb{Y} \mathbb{B}\mathbb{I}\mathbb{R}\mathbb{T}\mathbb{H}\mathbb{D}\mathbb{A}\mathbb{Y} \mathbb{D}\mathbb{A}\mathbb{D}

Today is my Dad's birthday and I thought I would try to make him whisky fudge for a change.

I followed the recipe through this pin

 Combining condensed milk, butter, sugar and syrup
(I used golden syrup I didn't know what glucose syrup was  :) )

 Sugar dissolved, increase heat and stir constantly for 10-15 minutes

 Until you have a very lovely caramel coloured mixture.  Soft ball on the thermometer (I love my new thermometer no more weird testing of dropping into water and seeing if it makes a ball - so many failed attempts!)

Remove from heat and add chocolate and whisky.  I  put aside a little bit without the whisky as I don't like it and it tasted GOOD!

 Spread out in a prepared tin.  Fridge for one hour.

Wrap up in a little bag with some ribbon and give to your victim...haha this was STRONG.  That's all my Dad said.  Less whisky next time I think!  Or none at all :) 

OoOoOoOoOoOoOo

I also got a new toy from one of my favourite online shops Cox and Cox so really wanted to try it out.  

Firstly I made ganache

 I heat up some double cream
 Poured it over chocolate to melt
 Then whisked it together with some vanilla extract and covered it in clingfilm until cooled

 Meanwhile I melted candy melts and poureed it into my new moulds.  I swirled it around before tipping out excess onto greaseproof paper
 My moulds are very shallow and the candy melts didn't pour out as easily as they were supposed to so if anyone has a child they may recognise this - it's the syringe type device you get with children's Nurofen. I have tons of these in my drawer and it came in very useful to remove the excess candy melts from my moulds :).  I used a Pampered Chef scraper to remove the excess from the top of the moulds.

I then left this for a while to harden.


Next I filled up a squeeze bottle with the cooled ganache.  I piped it on top of the hardened candy melts in my moulds.

 And left this to harden for 35 minutes
Once the ganache was set I melted more candy melts and covered the top of the moulds.  Again I used the scraper to remove the excess from the top of the mould.  Next time I think I would pipe the candy melts on top so they would be neater.  

I  left these to set overnight.

 In the morning I removed the ganache-filled chocolate lollipops and used the 6 and 1 for my Dad's homemade birthday present.  I didn't take photos of the other numbers because I forgot but a few of them broke anyway.  I think I will need to stick to chocolate lollies not filled lollies because the moulds are shallow but not bad for a first attempt.  I couldn't see many recipes for chocolate moulds that were not just melting chocolate and re-setting in moulds.  I don't see the point in that :) Anyone have any good recipes for chocolate moulds?

The recipe I followed for these came from this pin  

More chocolate gifts can be seen here

Monday 7 January 2013

✿ Lego ✿

I adore lego...when  Finlay gets lego I am so excited to build it up.  He likes it but not like me.  And now he is older he can make it himself :(  He also likes to break it up once it is built.  I don't like that :(  I realise that's the point but once it's built I want him to look after it - it took me  him so long and there is no chance of ever finding the right pieces again so it just turns into mess.  And where do you keep all this mess?  I have tried the big buckets, drawers etc but once you play with it it is everywhere.  Those pesky little lego men are out to get me.  I have stubbed my toe countless times and the tiny little pieces always find their way into my hoover. And if Finlay sees them in there he makes me sift through the hooverings - how gross is that??

How good would it be to have somewhere to play with the lego so it wasn't all over the floor, somewhere to save the masterpieces and somewhere safe for the tiny little lego heads and extras -  so they can escape the hoover (and I can escape putting my hand in there :o )

Well I have acquired two solutions in the last month :) First of all I want to say thanks to Tiffany at Making the World Cuter for her competition to win a Lay'N'Go Lite (see her post here).  Ooops I entered without checking terms and conditions and you were supposed to live in the US....I WON!! :D  When Carissa Rogers at GoodNCrazy emailed to check my address I realised I was not supposed to enter.  But Carissa was fantastic and we instantly became friends - she liked the Scottish sound of my emails - apparently "brilliant" is a very UK thing to say!  She quickly posted out my Lay'N'Go Lite and  it came in time for Christmas!  Thank you so much Carissa!  This is the little version - there are much bigger ones on the website (Lay'N'Go) but this size is perfect for me.

The lego the kids are playing with or the Christmas box that has just been opened gets tipped onto here


They play with them for 5 minutes - (then I take over :) ) - and once we are finished instead of it being all over my carpet I can fasten the toggle and they are all safely inside.  

We can also take them away without fear of a spillage in the car.  Nobody wants lego heads under the brake pedal :o 

And it has this handy little pocket for the most important pieces - this is Finlay's favourite - Superman.  Remember how obsessed he is with Superman?  (Here, here and here :) )  I love teeny tiny lego Superman - and Clark Kent :) 
So the Lay'N'Go is perfect for playing with lego and also storing lego, carting lego around and saving the hoover and my toes from pesky lego men and bricks.

The next solution both my children got this Christmas my brother-in-law made.


A big lego tray!!  
My sister found this pin and convinced her husband to make 4 of these for my two and her two :)

It is so much fun building on here and when you are in the middle of a masterpiece but have to make tea do your homework the tray is a safe place to leave semi-built lego

  Also good for a hero battle

Or a bedroom - big lego bricks work too :) 

Now the lego can be displayed without rolling under the couch and doesn't have to all be packed away before the building is complete.  

Thanks Uncle Grant!!

✿  Now get to bed kids I have some lego I need to play with....and you don't have anything you need to tidy up first! ✿